Hi again, peeps!
I'm back with another post. This time, we'll be looking at how to authenticate users with Discord server roles using Next.js and Next-Auth.
Table of Contents
Introduction
Next-Auth is an excellent alternative to setting up a traditional user authentication system when using Next.js. It's quite straightforward to set up and allows users to login using credentials from OAuth services like Google, Discord, Apple, and many more.
In this post, I'll demonstrate how to set up Auth0 to authenticate users with Discord server roles.
Why Am I Doing This?
I needed user authentication for a project I'm currently working on. While it's not an absolute necessity, I planned on adding some features that I wouldn't want accessible in the demo. Normally, I would just opt to never share the project widely with others. However, I was aiming for another portfolio project.
This is a project that I want to nurture and grow. I seek to engage in conversations with users who use it. I want their feedback but also want to be as hands-off as possible.
Next-Auth offers dozens of options for providers. I chose Discord because it would essentially allow me to create a small community of people who are interested in my project. Plus, I can add roles for different levels of access, and users can choose the roles they prefer.
Prerequisites
- A Next.js project with Next-Auth set up
- Discord server with full access (optional)
- A Discord application to handle user logins
Setup
Discord Application
We'll need a Discord application to do the heavy lifting. It'll be responsible for inviting users to our server and reading the permissions they have. To get the DISCORD_CLIENT_SECRET and DISCORD_CLIENT_ID that we'll need later, we'll need to create this bot.
- Access the Discord Developer Portal
- Create a new Application and name it whatever you want (I named the example
Next-Auth) - Access the OAuth2 > General tab
- Reset the
CLIENT SECRETbefore copying both it and theCLIENT ID. Save these for later. - Add a redirect URL (the default is
http://localhost:3000/api/auth/callback/discordfor the example)
https://example.com/api/auth/callback/discordNext.js and Next-Auth
/app features, but this example uses the /pages directory. There is no difference for this example.Add the following to your .env.local file:
DISCORD_CLIENT_ID=YOUR_DISCORD_CLIENT_ID
DISCORD_CLIENT_SECRET=YOUR_DISCORD_CLIENT_SECRET
The Next thing we need to do is set up Next.js with Next-Auth. For this, you can either clone the Next-Auth example repo or follow the Next-Auth documentation. I'll be using the example repo so that you can follow along.
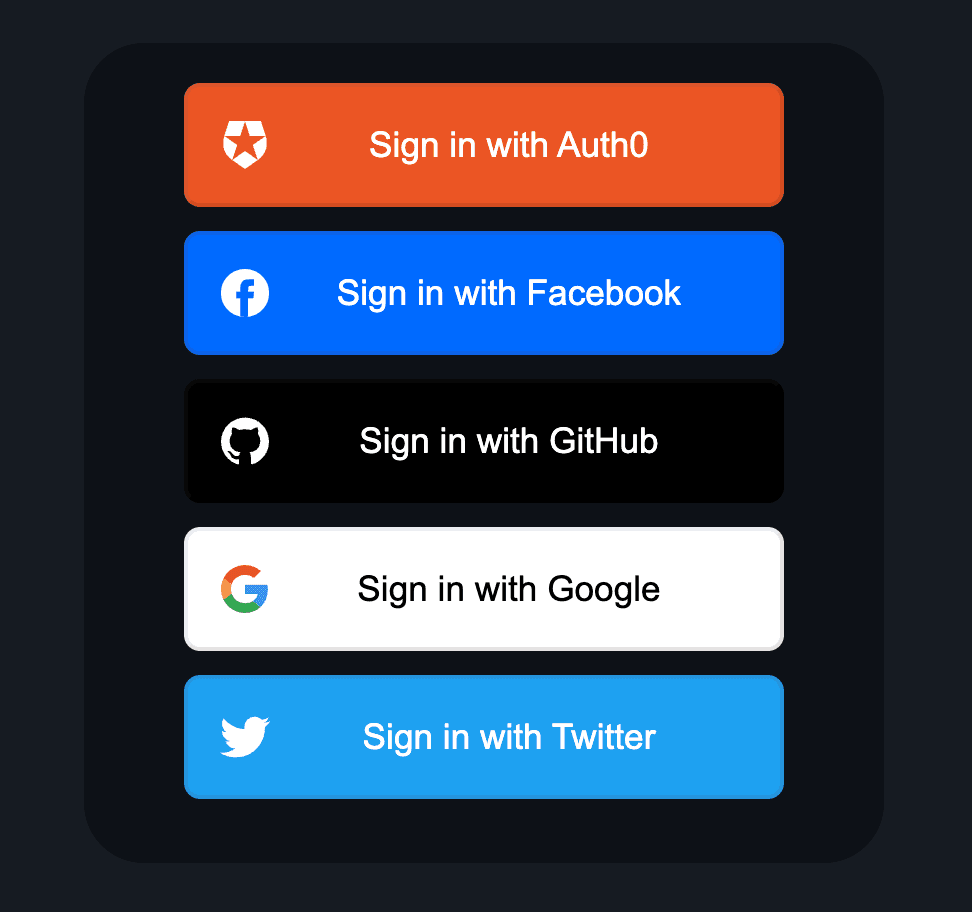
Once set up, head over to http://localhost:3000/api/auth/signin to confirm that everything is working. You should see a page that looks like this:
Whether you choose to use an existing project or clone the example, you should eventually have an API route named auth/[...nextauth].ts or auth/[...nextauth]/route.ts or something similar. The default contents of the file contain several providers that are safe to remove. Let's start by replacing the contents with the following:
import NextAuth, { NextAuthOptions } from "next-auth"
import DiscordProvider from "next-auth/providers/discord"
// https://discord.com/developers/docs/topics/oauth2#shared-resources-oauth2-scopes
const scopes = ["identify", "guilds"].join(" ")
export const authOptions: NextAuthOptions = {
session: {
strategy: "jwt",
},
providers: [
DiscordProvider({
clientId: String(process.env.DISCORD_CLIENT_ID),
clientSecret: String(process.env.DISCORD_CLIENT_SECRET),
authorization: {
params: { scope: scopes.concat(" guilds.members.read") },
},
async profile(profile) {
return profile
},
}),
],
callbacks: {
async signIn({ user, account }: any) {
if (account.provider === "discord") {
// Do something
return false // for now
}
// Allow sign-in for other providers
return true
},
async jwt({ token, user }: any) {
return { ...token, ...user}
},
async session({ session }: any) {
return session
},
},
}
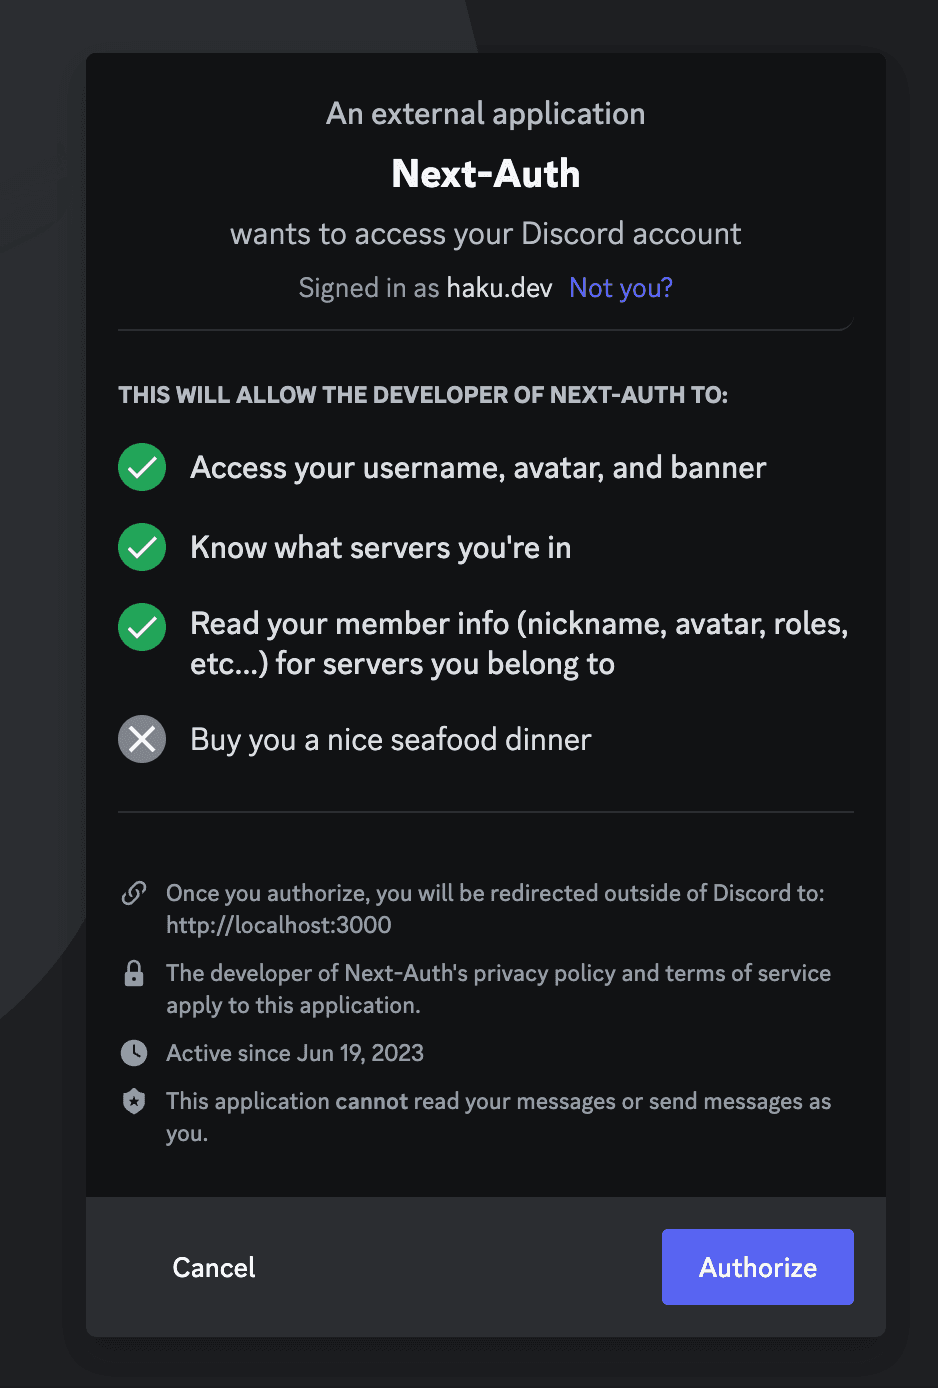
export default NextAuth(authOptions)This base file will give us a /signin page that only contains Discord. When you click it, you should be greeted with a Discord sign-in page with your bot's name and the permissions it's requesting. Attempting to sign-in should fail for now. We'll fix that in a bit.
Discord Server
I prefer to have full permissions on the server where I'm doing this. However, you can pull this off without it because you only need the server id and role id.
Once you are in your server of choice:
- Right-click on the server name and select
Copy Server ID - Right-click on the role you want to use and select
Copy ID(you can copy roles from the server settings or from a user's preview)
Update the Next-Auth Callback
We should now have all of the environment variables we need. Update your .env.local file:
DISCORD_CLIENT_ID=YOUR_DISCORD_CLIENT_ID
DISCORD_CLIENT_SECRET=YOUR_DISCORD_CLIENT_SECRET
DISCORD_SERVER_ID=YOUR_DISCORD_SERVER_ID
DISCORD_ENTRY_ROLE=TARGET_DISCORD_ROLE_ID_FOR_LOGGING_IN
Now we can update the callback to allow us to login.
import NextAuth, { NextAuthOptions } from "next-auth"
import DiscordProvider from "next-auth/providers/discord"

// https://discord.com/developers/docs/topics/oauth2#shared-resources-oauth2-scopes
const scopes = ["identify", "guilds"].join(" ")

export const authOptions: NextAuthOptions = {
  session: {
    strategy: "jwt",
  },

  providers: [
    DiscordProvider({
      clientId: String(process.env.DISCORD_CLIENT_ID),
      clientSecret: String(process.env.DISCORD_CLIENT_SECRET),
      authorization: {
        params: { scope: scopes.concat(" guilds.members.read") },
      },

      async profile(profile, tokens) {
        let isAuthorized = false
        let isAdult = false

        // Fetch the list of servers the user is a member of
        const response = await fetch(
          "https://discord.com/api/users/@me/guilds",
          {
            headers: {
              Authorization: `Bearer ${tokens.access_token}`,
            },
          }
        )

        const guilds = await response.json()

        // Check if the user is a member of the target server
        const targetGuild = guilds.find(
          (guild: any) => guild.id === process.env.DISCORD_SERVER_ID
        )

        if (targetGuild) {
          // If the user is a member of the target server, they are authorized
          isAuthorized = true

          // Fetch the member data from our auth server
          const memberResponse = await fetch(
            `https://discord.com/api/users/@me/guilds/${process.env.DISCORD_SERVER_ID}/member`,
            {
              headers: {
                Authorization: `Bearer ${tokens.access_token}`,
              },
            }
          )

          const memberData = await memberResponse.json()

          // Check if the member has the 'adult' role
          // isAdult =
          //   isAuthorized &&
          //   memberData.roles.includes(process.env.DISCORD_ADULT_ROLE)

          // Assign roles to profile
        }

        return {
          id: profile.id,
          name: profile.username,
          email: profile.email,
          image: `https://cdn.discordapp.com/avatars/${profile.id}/${profile.avatar}.png`,
          isAuthorized: isAuthorized,
          // isAdult: isAdult,
        }
      },
    }),
  ],

  callbacks: {
    async signIn({ user, account, profile }: any) {
      if (account.provider === "discord") {

        // Grant access only if the member has the required role
        return user.isAuthorized
      }

      // Allow sign-in for other providers
      return true
    },

    async jwt({ token, user }: any) {
      return { ...token, ...user}
    },
    async session({ session, user, token }: any) {
      // session.isAdult = token?.isAdult
      return session
    },
  },
}

export default NextAuth(authOptions)
Note that there are references to isAdult that are commented out. In my project, I have an additional .env variable and role to target adult users. If you want to do this, uncomment those lines and add the DISCORD_ADULT_ROLE variable to your .env.local file.
How Does It Work?
Discord provides Next-Auth with a token that may be used to fetch information about the user. If you request the correct permissions, you can get the user's guilds and roles. This enables you to check if the user is a member of the target server and if they have the correct role.
The profile, signin, jwt, and profile callbacks are all modified to allow us to pass certain information to the user's session. Elsewhere in the project, we can check the session and determine if the user is authorized to view the content. The example exposes the session object at http://localhost:3000/api/examples/session

Automatic Role Assignment
If you want users to be able to assign their own roles, you can use one of these popular bots. I'm a fan of Carl Bot.
Conclusion
This is a basic example of how to use Next-Auth with Discord roles as a method of authentication. You can use this to gate content, create a members-only area, or anything else your imagination can come up with. Hope this helps!